Full-screen app (TUI)
The full-screen app is the CLI's default landing experience: run a bare revenexx on an interactive terminal and it opens here. Instead of remembering command names and flags, you browse the command tree in a sidebar, fill in a command's parameters with a guided form, and read the results in a scrollable table — all in one screen that always shows which tenant and endpoint you're working against.
It's built on the same command tree as everything else, so every service command, plugin command, and alias is reachable, and every action maps to a plain one-shot command you can copy out and script.
revenexx drops you here. For the full tour of every mode and command, see the command-line overview.revenexx # bare invocation on a TTY — launches the TUI (the default)
revenexx tui # always launches it explicitly, from anywhere
revenexx tui launches the app explicitly and works everywhere — inside the REPL, from a script wrapper, or when you've changed the default mode. A bare revenexx opens it only on an interactive terminal, and only when you haven't opted out (see Launching the TUI below).
On launch you land on the welcome screen: the command browser on the left, a banner in the main pane, and the header already showing your identity, tenant, and endpoint — with the ▲ PRODUCTION chip when the context is sensitive.
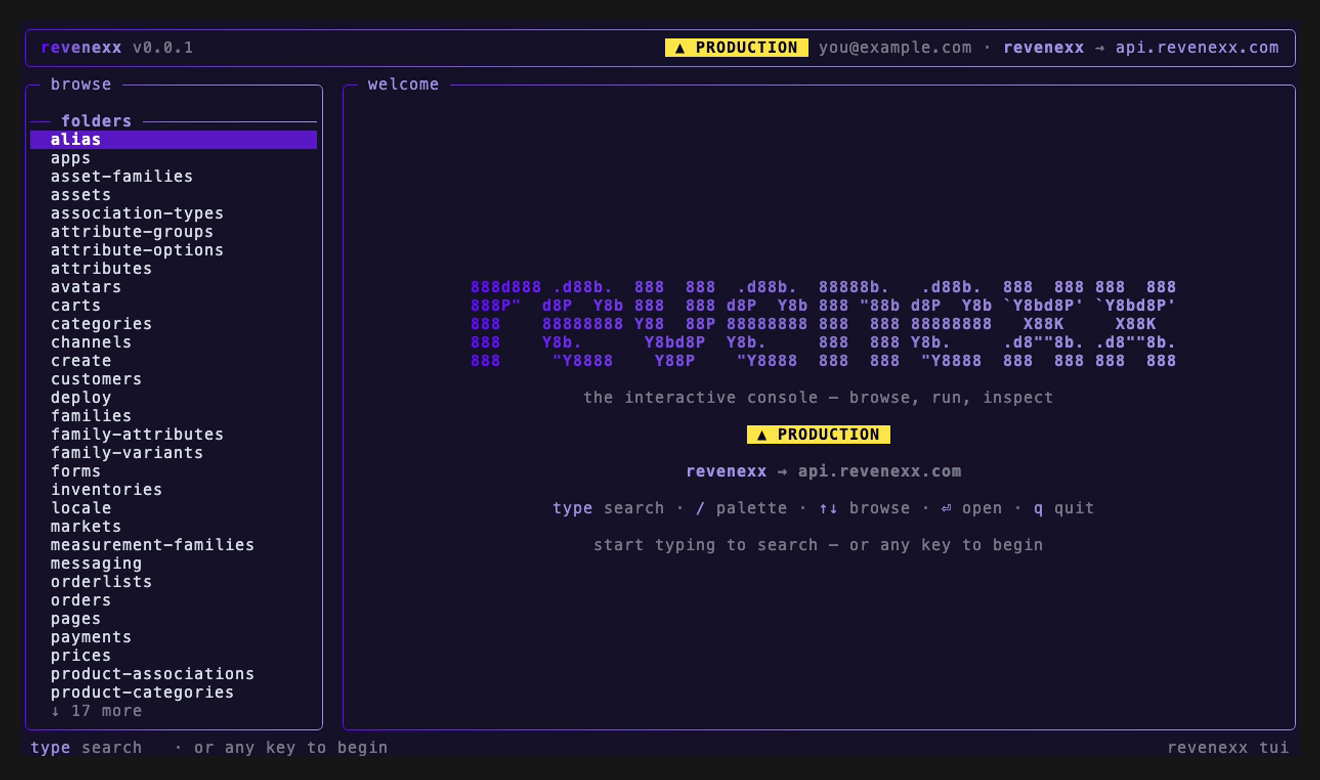
The app needs an interactive terminal (a TTY). In a pipe or CI it exits immediately:
The TUI needs an interactive terminal. Run 'revenexx tui' from a TTY, or use one-shot commands instead.
Launching the TUI
On an interactive terminal, a bare revenexx — with no command and no --json or --help — launches the TUI. This is the new default; revenexx tui still launches it explicitly from anywhere. The other entry points are unchanged:
- A partial or named invocation (
revenexx p,revenexx products) opens the guided command picker and resolves to a single one-shot command — your muscle memory still works. - Non-interactive contexts — a pipe, CI,
--json, or--help— print help and never open the TUI, so scripts stay byte-for-byte identical to before.
Opt out of the default
If you'd rather a bare revenexx not open the full-screen app, choose a different default mode. See Project configuration → Default mode for the full precedence rules.
REVENEXX_NO_TUI— set it to1(any value other than0/false) and a barerevenexxfalls back to the guided picker.defaultMode:in.revenexx.yaml— set a per-project default:tui(the default),guided(the picker), orhelp(print usage).
REVENEXX_NO_TUI wins over the config file, and explicit subcommands (repl, tui, any service command) always win regardless of either setting.
The layout
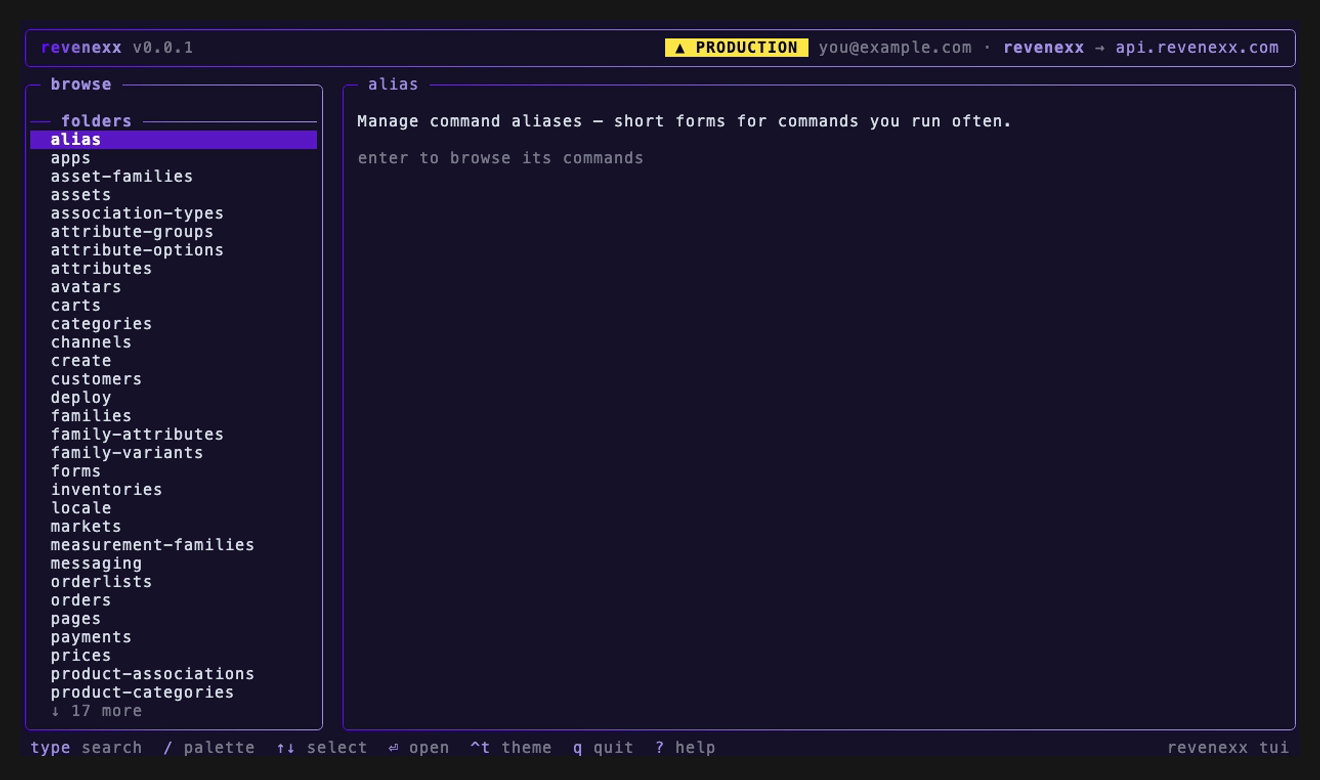
The screen has three fixed parts and one that changes as you work:
- Header — the
revenexxwordmark and version, the signed-in user, and thetenant → hostyou're pointed at. When that context is production, a yellow ▲ PRODUCTION chip appears — the same safeguard as the REPL's production banner, kept in view the whole session. - Command browser (left) — the searchable list of groups and commands, split into folders (groups you open into) and runnable commands. Selecting an entry shows its details on the right; opening a folder drills into its commands.
- Main pane (right) — shows a command's details, its parameter form, or its results, depending on where you are.
- Status bar (bottom) — the keys you can press right now, and after a run, the method, path, exit code, and duration of the last call.
Browse and run
Move through the command browser and open what you want:
| Key | Action |
|---|---|
↑ / ↓ | Move the selection |
Enter / → | Open a group, or open/run the selected command |
Esc / ← / Backspace | Go back a level (at the top level, Esc quits) |
q | Back one level, or quit at the top level |
/ or any letter | Start filtering the list by name |
Start typing (or press /) to search across every command at once — the list narrows as you go and the top match is selected:
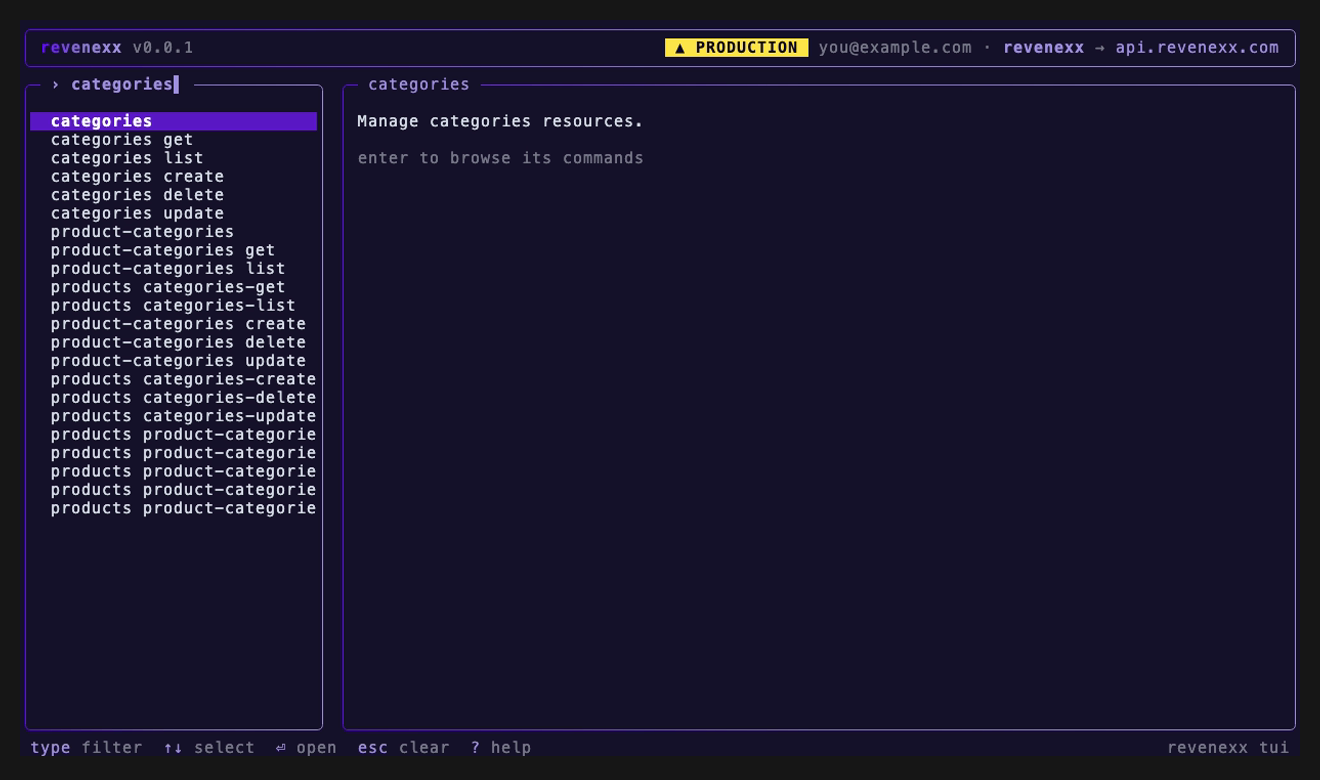
Opening a command does the sensible thing: if it has required parameters, the form opens; if it deletes data, you go straight to a confirmation; otherwise it runs right away. The detail pane also shows the equivalent one-shot command (one-shot: revenexx <path>) so you always know how to reproduce it in a script.
A handful of commands are left out of the browser because they don't fit a browse-and-run shell — tui and repl (they start their own sessions), and update, generate, types, and completion (local tooling that writes files rather than calling the API). You can still run all of them directly as one-shot commands.
Fill in a form
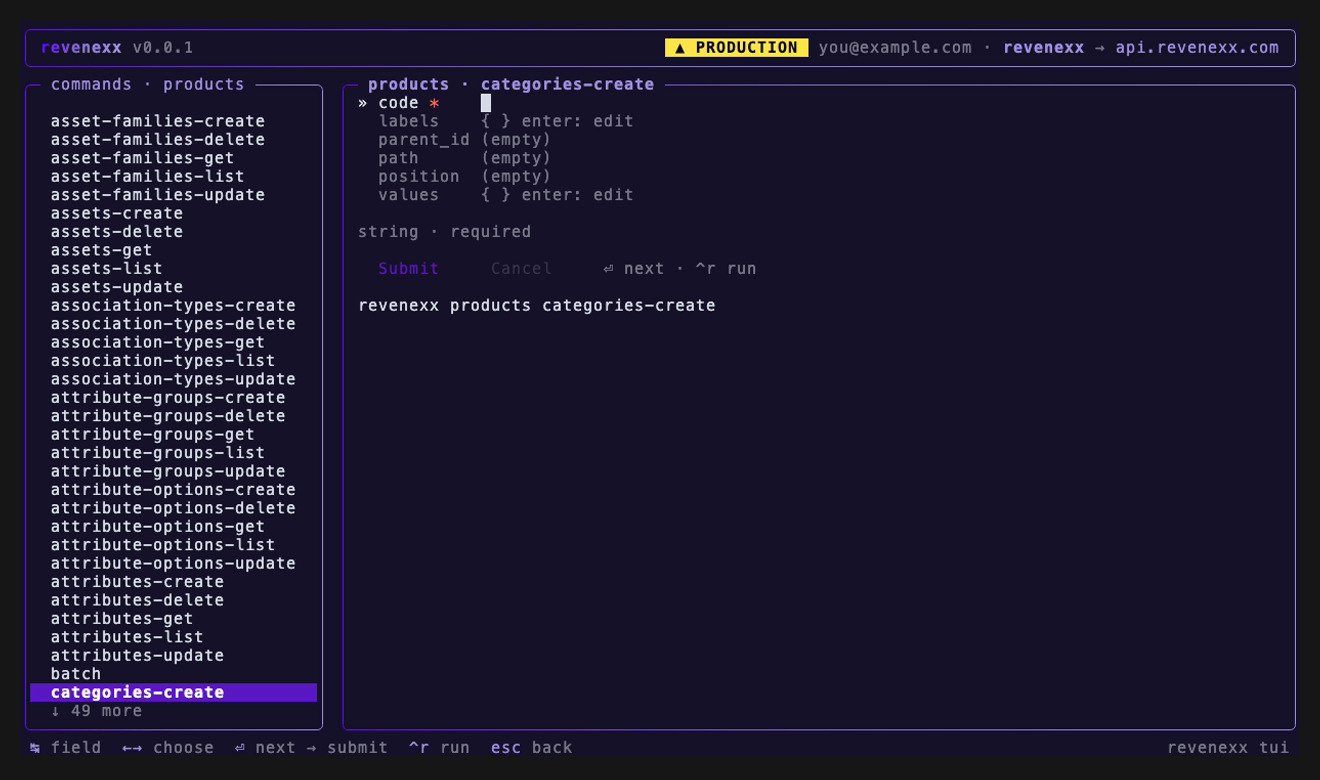
When a command needs input, the form collects it — positional arguments first, then required options, then optional ones. Each field matches its type: text, a true/false toggle, a radio row or cycle for choices, comma-separated lists, and a built-in editor for object and array (JSON) inputs. A live, shell-quoted preview of the one-shot command builds at the bottom as you type.
| Key | Action |
|---|---|
Tab / ↓ | Next field |
Shift+Tab / ↑ | Previous field |
← / → / Space | Cycle a toggle or choice field |
Enter | Next field, run on the last field, or open the resource picker on an empty ID field |
Esc | Back |
Submitting validates first: missing required values, non-numbers, and invalid JSON are flagged inline and focus jumps to the first problem. Secret fields — passwords, tokens, and API keys — are masked as you type and in the command preview.
Edit nested JSON
Object and array fields (shown as { } enter: edit in the form) open a JSON editor, so you build the value as a list of fields instead of hand-writing braces and commas. Each row is a key : value pair; the value is entered as JSON — strings stay quoted, and numbers, booleans, and null are validated live. A running preview at the bottom shows the assembled JSON (✓) or the first error (✗).
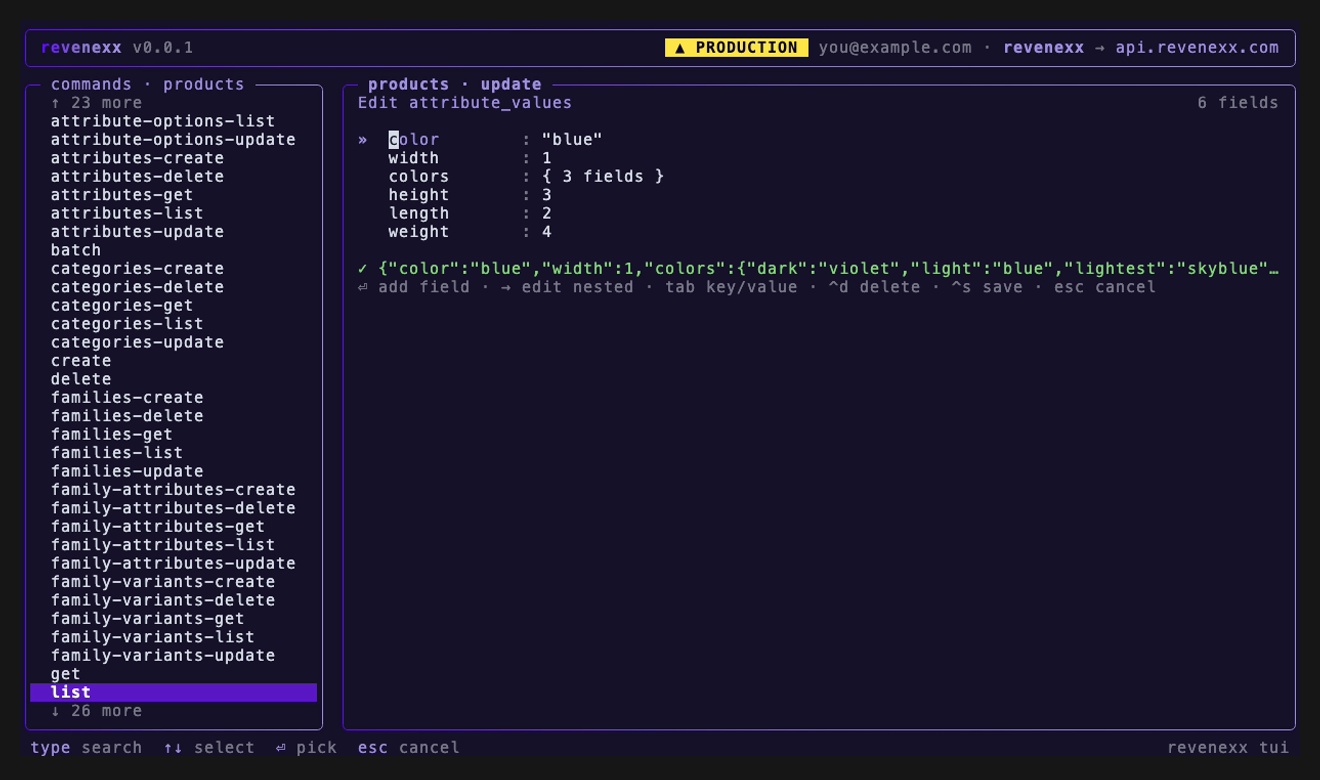
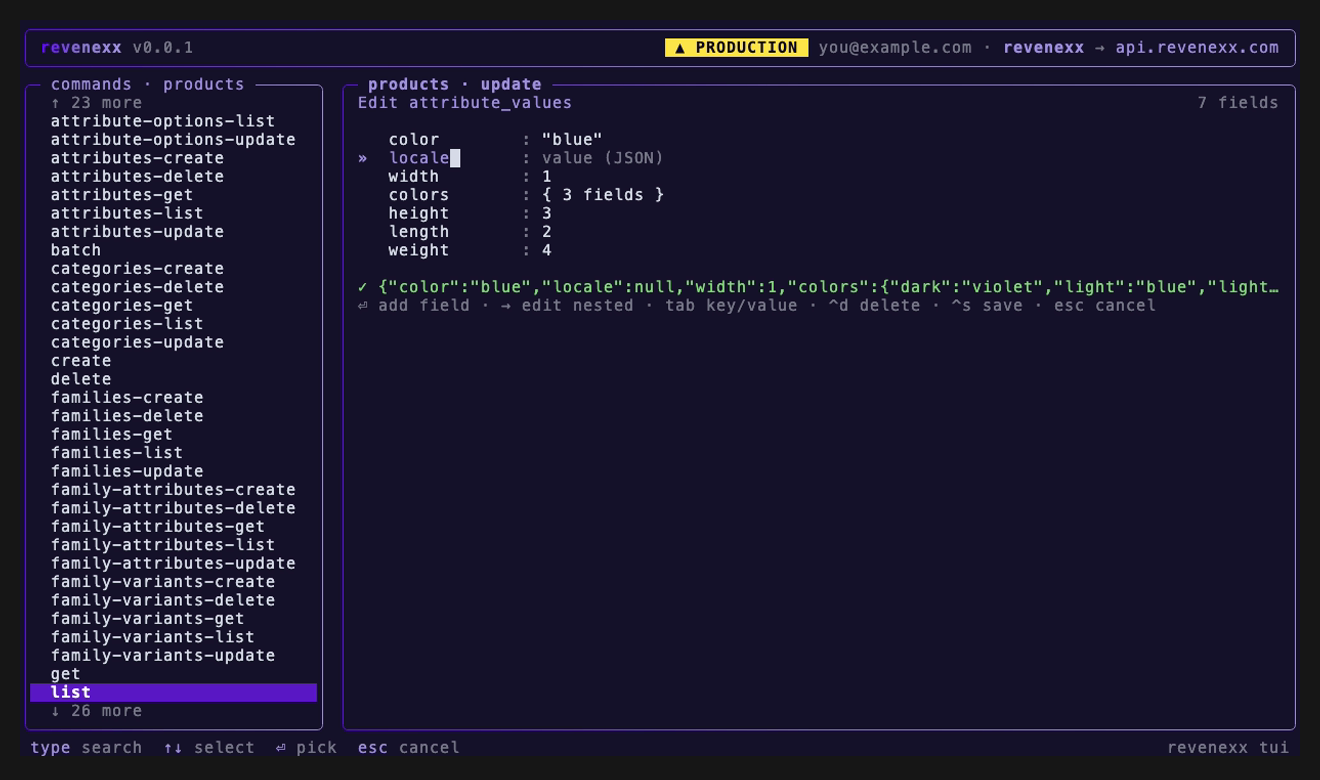
The key bar is ⏎ add field · → edit nested · tab key/value · ^d delete · ^s save · esc cancel. Press Enter to add a field, Tab to move between a field's key and its value, ^d to delete the one under the cursor, and ^s to save the whole value back into the form.
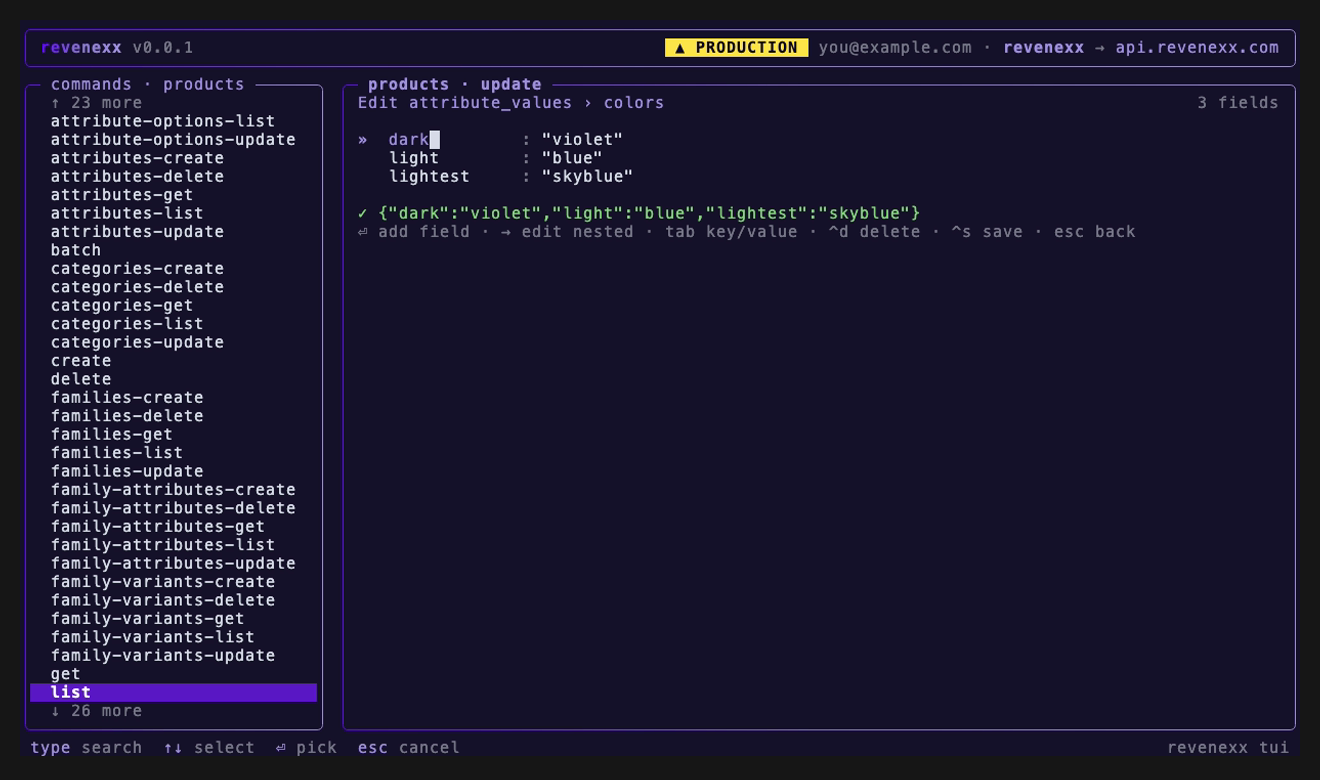
Any field whose value is an object or array is itself editable: Tab to its value and press → to descend into it. The header breadcrumb tracks where you are (attribute_values › colors), array items are keyed by index, and Esc steps back out one level.
Pick a resource by search
For a field that takes a resource ID, press Enter on it to open a picker instead of pasting an ID. It lists the matching resources with a friendly label and the raw ID; type to search (against the API where the endpoint supports it, otherwise filtering the first page). ↑/↓ selects, Enter picks, and Esc returns to typing the value by hand.
Confirm destructive actions
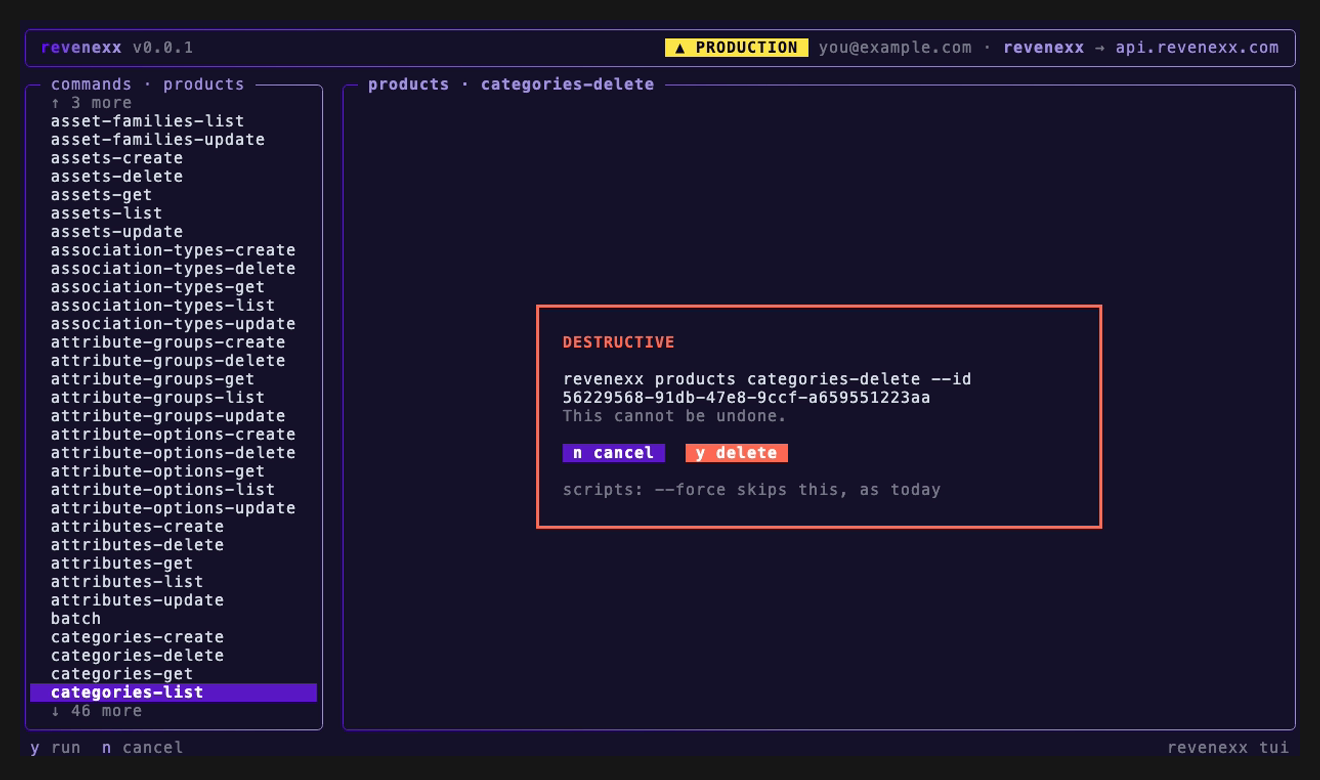
Commands that delete data show a red confirmation before anything runs. Press y to go ahead or n (or Esc) to cancel — it defaults to cancel. In scripts, --force skips this step, exactly as it does outside the TUI.
Read the results
Collections come back as a table you can move around; a single object shows as a key-value sheet; failures show an error panel with the code and type.
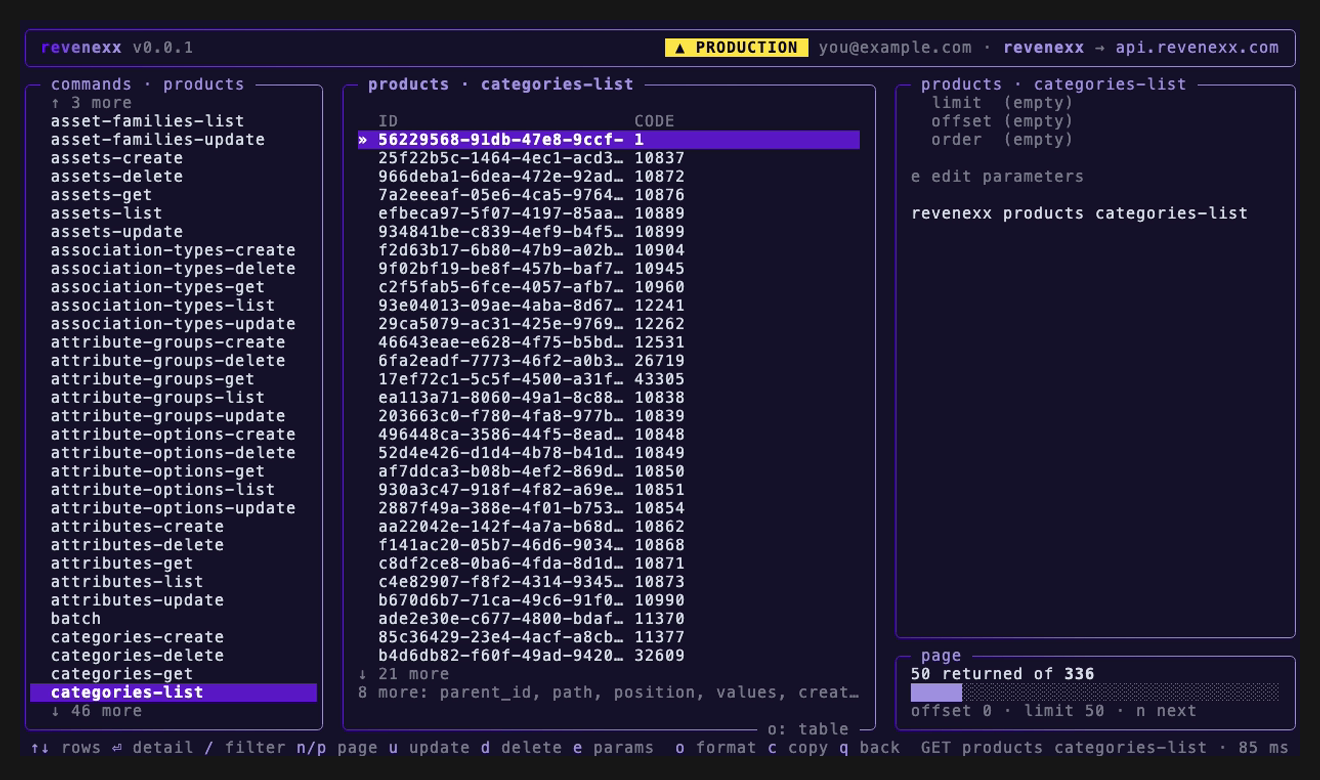
| Key | Action |
|---|---|
↑ / ↓ | Move the row cursor (or scroll text views) |
Enter | Open the selected row's detail |
← / → | Scroll table columns (the first column stays pinned) |
n / p | Next / previous page |
o | Cycle output format — table, json, jsonl, csv |
c | Copy the output to the clipboard |
u | Update the selected record — opens the matching update, pre-filled |
d | Delete the selected record — asks to confirm first |
e | Jump back to the parameters to change them |
Esc / q | Close the detail, or go back |
Copying (c) grabs the full result in the current format — pretty JSON when you're in the table view — and confirms with a brief ✓ copied toast. Paging (n/p) uses the command's limit and offset, and the sidebar shows how many records you've seen out of the total.
Update or delete in place
You don't have to copy an ID and start a new command to act on what you're looking at. From a list row or a single get, the same two keys work on the record under the cursor:
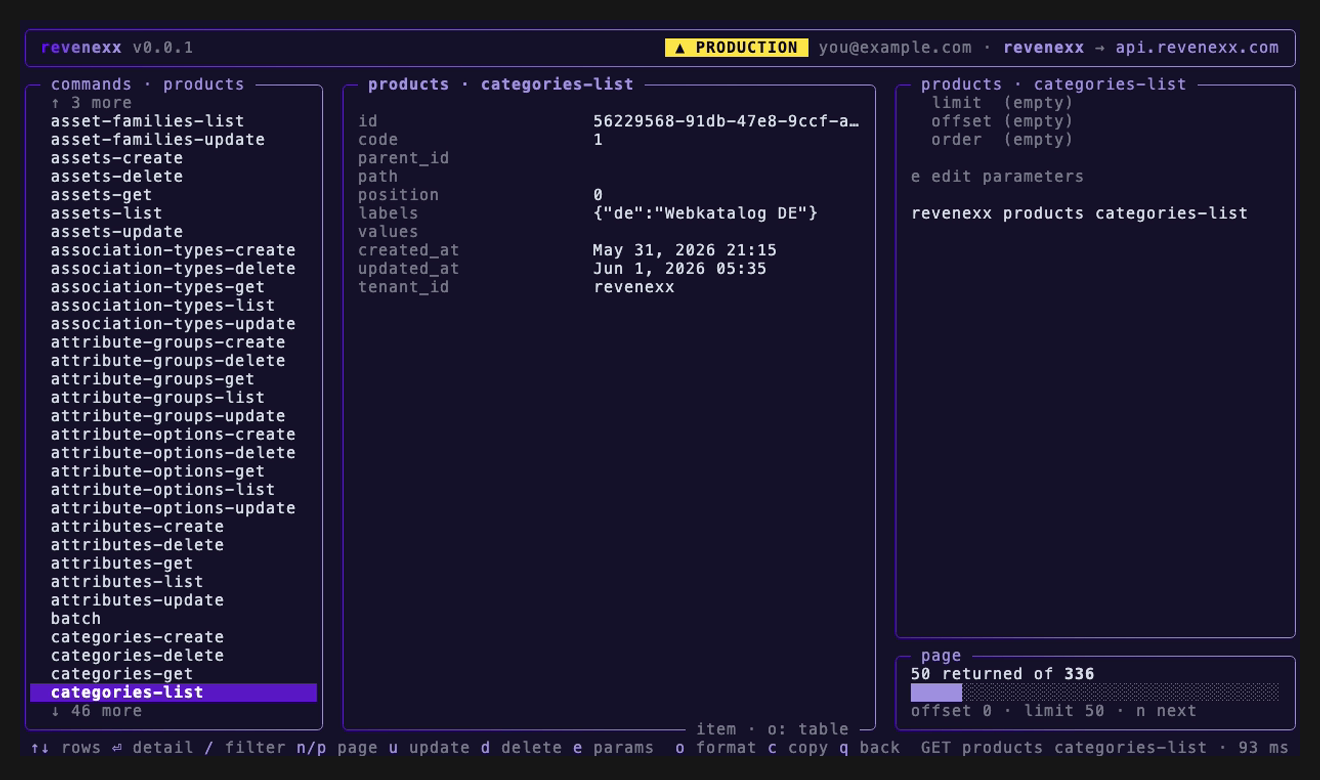
Press u to update: the CLI opens the matching update command with every field pre-filled from the record, so you change what you need and run it — the same form as filling in a command, just already populated.
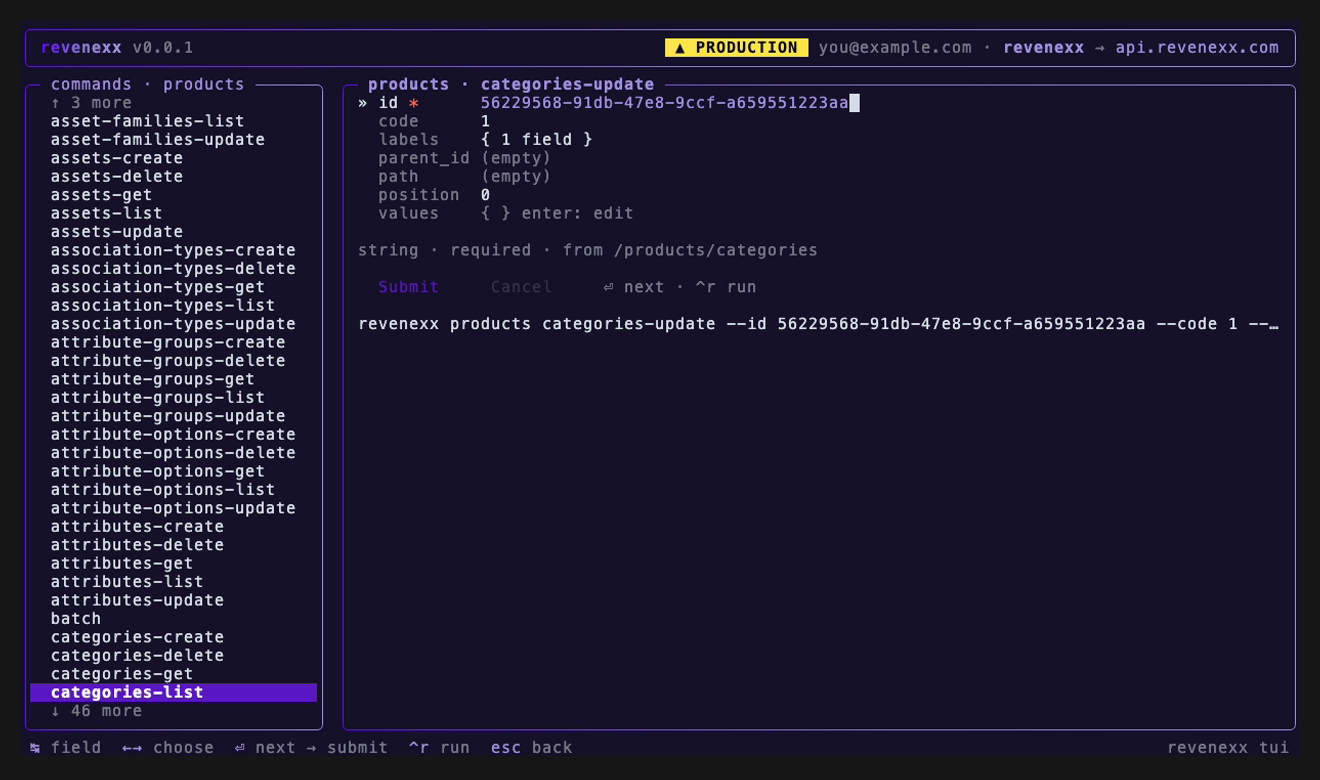
Press d to delete: it routes through the same red destructive confirmation as running delete directly, defaulting to cancel. Both actions map to a plain one-shot command you can copy out — nothing happens to production data without the same confirm and --force rules that apply everywhere else.
What's next
- Turn the commands you run most into aliases.
- Run the same commands at a prompt with the REPL, or headless in CI and scripts.
- Browse every group and command in the command reference.